Introduction
There are two typical scenarios for direct connections to remote computer.
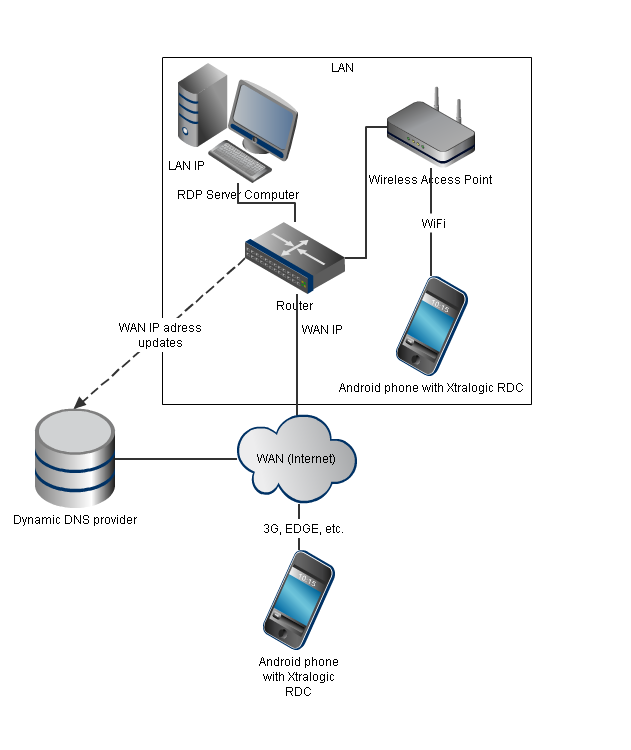
One scenario is when the phone is connected to the local area network (LAN) over WiFi.
In this scenario the Xtralogic RDC connects over WiFi through the wireless access point directly to the RDP server computer. The LAN IP address of the computer is used to connect.
Another scenario is when the phone is connected to the wide area network (WAN) over cellular data network (3G, EDGE, etc.).
In this scenario the connection will go through the wireless carrier network, then you cable or DSL provider network, then your network router and finally to the RDP server computer.
WAN IP address or a DNS name provided by DDNS is used to connect.
Step 1 – Configure Remote Desktop on the remote computer
Follow one of the following links for the operating system on the RDP server computer.
Follow one of the following links for the operating system on the remote computer and the desired protocol.
Step 2 – Make sure the LAN IP address of the host computer is not going to change over time (optional)
You can skip this step for now, but keep in mind that your computer is most likely set up to get an IP address from a DHCP server (which is usually running on the router).
The DHCP server allocates the IP addresses from its pool of available IP addresses and it can give your computer a different IP address when the computer is restarted.
Routers usually have a feature that allows to reserve a certain IP address for a specific computer (based on its MAC address).
This is the best solution. Follow the router user manual on how to set up the DHCP reservation.
If the DHCP reservation feature is not available on your router, then you will need to manually set a static IP address on the computer you are going to connect to.
Choose an IP address unused on your local network and
follow instructions for your operating system on how to setup a Static IP Address at Port Forward.
Step 3 – Connect Xtralogic RDC to the remote computer over LAN
Even if your eventual goal is to connect only when you are away from home, over WAN, it is recommended to connect over LAN to test the Remote Desktop configuration on the remote computer.
Make sure that the phone is connected over WiFi to your LAN (there is no ‘H’, ‘3G’ or ‘E’ icon at the top of the screen).
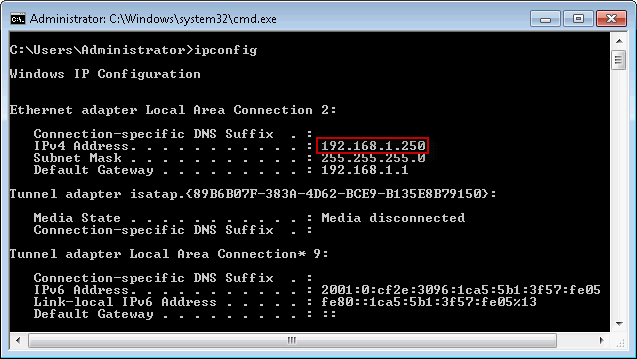
To get the LAN IP address of the computer, press Windows Logo key and R key at the same time,
then type cmd in the Open field and press Enter.
Type ipconfig at the command prompt and press Enter.
The output shown below is from Windows 7, it looks similar for the other Windows versions.
Start Xtralogic RDC on the phone. If you haven’t saved any connections yet, you will be presented with a welcome screen. Click Next on that screen. If you already have created connections,
in order to add another one, touch Menu > Add server.
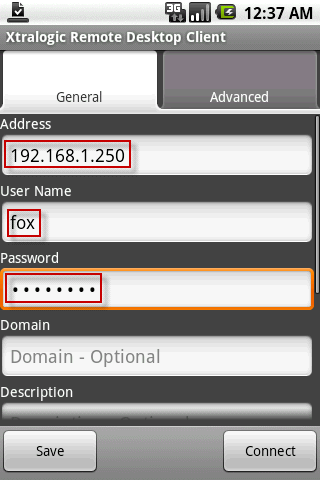
Enter the LAN IP address in the Address field of the Xtralogic Remote Desktop client and touch the Connect button (the connection entry you have just created will be also saved).
If you have not entered user name and password, you will be prompted for them later, after a connection will be established.
Step 4 – Set up port forwarding on the router
Computers connected to LAN behind a router are not directly accessible from WAN, because the router performs network address translation (NAT). Only WAN IP address is accessible from the Internet (see Figure 1). In order to make a computer on the local network accessible from WAN, a port forwarding configuration entry, or rule, needs to be created on the router. The terminology may vary for different router vendors, but port forwarding rule essentially has the following four components: a protocol (TCP or UDP), a WAN (external) port number, LAN (internal) IP address and port. According to the rule, all communication coming to the port on WAN will be forwarded to the LAN IP address and port. Let’s use the following notation to record a port forwarding rule:
[protocol] [WAN port] -> [LAN IP address]:[LAN port]
For Remote Desktop, by default, the LAN port is TCP port 3389. The WAN port number can be chosen to have the same value, 3389. So the simplest port forwarding rule for one computer using the default ports will look like this:
TCP 3389 -> 192.168.1.250:3389
The external port number is not limited to the default value and can be randomly chosen to be between 1024 to 65535:
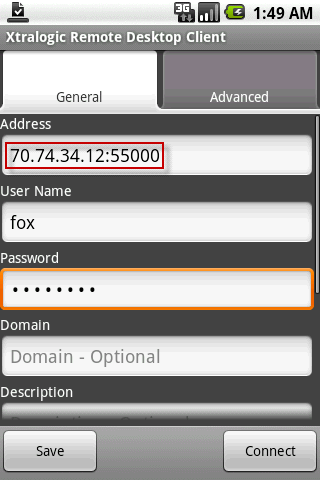
TCP 55000 -> 192.168.1.250:3389
The Xtralogic RDC can connect to any port. The non-default port number can be specified in the address field after a colon (the default port 3389 does not need to be explicitly specified).
Using a non-default WAN port helps with security a bit, because an attacker would need to determine the port number first. Also, use of non-default WAN ports is necessary when multiple computers are needed to be accessed from WAN. In such case a port forwarding rules with different non-default WAN port numbers have to be created for each computer. E.g, if you have three RDP servers on the local network with LAN IP addresses 192.168.1.250, 192.168.1.249 and 192.168.1.248, you will need to configure the following port forwarding rules:
TCP 55000 -> 192.168.1.250:3389
TCP 55001 -> 192.168.1.249:3389
TCP 55002 -> 192.168.1.248:3389
And if, for example, your WAN IP address is 70.74.34.12, the following WAN addresses to access each of the computers will have to be used in the Xtralogic RDC: 70.74.34.12:55000, 70.74.34.12:55001, 70.74.34.12:55002.
After the required port forwarding rules are determined, configure them on the router. Please use a great resource on port forwarding for your specific router model at Port Forward. On that site, find your router in the list and click on it. You will be presented with advertisement for an automatic port configuration tool. If you don’t want to purchase the tool and want to do the port configuration manually (we recommend to try that first), just follow “Click here to skip this advertisement” link in the upper right corner, and on the next page find “Remote desktop” in the list.
Step 5 – Connect to the RDP server computer over WAN
To determine your WAN IP address, use whatismyip.com or ipchiken.com service. In Xtralogic RDC, add a new connection entry with the WAN IP address, or to modify an existing one, long press on an entry in the connection list and select Edit. In the Address field enter the WAN IP address, and if you have configured non-default port, enter port number after a colon.
Step 6 – Set up Dynamic DNS (optional)
Unless you have purchased a static IP address from your ISP, your WAN IP address can be periodically changed by the ISP, for example when you router is restarted. As a result you won’t be able to connect when you are away from home.
To solve this problem a DNS name from a Dynamic DNS (DDNS) provider should be obtained. That DNS name will not change while the account with the DDNS provider is maintained and will resolve to the correct IP address. The DDNS is usually offered as a free service.
Setting up the DDNS consists of creating an account with DDNS provider, choosing a DNS name, and configuring IP address updating service on your router or installing updating software on a computer connected to your LAN. One such DDNS provider is Dyn.com.
Follow the Dynamic DNS setup guide by Dyn.com. After you obtained the DNS name, use it instead of the WAN IP address in the Address field of the Xtralogic RDC. If you use non-default port number, specify it after a colon after the name.